
If you are using Clearstory to create Time and Material Tags and Change Order Requests you will definitely want to add your rates to the system making it easy for your team to create these documents.
In this article we are going to show you how to do the following things:
- Overview of how Clearstory rates work
- Create different groups of rates
- Add labor rates
- Add material rates
- Add equipment rates
- Add "Other" rates
- Add COR Mark Up rates
- Manage project-level rates
Overview
Clearstory is designed to help your company manage the rates you charge on Change Order Requests as efficiently as possible. Here are a few important concepts to understand how our rates work.
- At the company level, you can create as many "Groups" of rates as you need for labor, material, equipment, other and mark up rates.
- In each of these categories, you can select one group you created to be your "Company's Standard" default group of rates. This way, whenever you create a new project these "Company Standard" rates will automatically be applied to the project.
- You can easily apply a different group of rates to a project once it is created by swapping it in the drop-down section or you can individually edit the rate line items as needed on the project.
- The rates you apply to a project will appear in a few locations through out Clearstory.
- When you create a Time and Material Tag using our mobile app you will see the labor, material, equipment and other rates name as an item to tap to select in a drop down. When creating a T&M Tag the rate will not be shown.
- When you go to create a COR in Clearstory from a T&M tag the associated rate will automatically pull in.
- When you create a COR from scratch in Clearstory you can select from the pre-populated line items and the rate and unit will pull in.
Create groups of rates
In each rate section, the first step is to create a group in which the associated rates will live. Some companies might just have one standard set of rates or other companies might have rates depending on the local union, their customers or the different regions they work in. Instead of having to look up those rates in excel you can pre-populate and manage them in Clearstory.
In this example, we will show you how to create and manage labor rate groups which are the same workflow for all of the rate sections (Labor, Material, Equipment, Other and COR Mark Ups).
- To get to this section you must be an Admin user in your account.
- Navigate to Settings > Labor Rates.
- Here you will see your account already populated with one group called "Default". You can change the name of this group by clicking the edit icon or delete it after you create a new group.
- To create a new group, click on "+ADD GROUP" and enter the group name in the pop-up.
- Once created, click on the line item of the group and you will be taken into that group's list of rates, which will be empty to start.
- By checking a group as Company Standard it will pull into all newly created projects in Clearstory by default.
Add Labor Rates
To add labor rates, first, click on the group you would like to add rates.
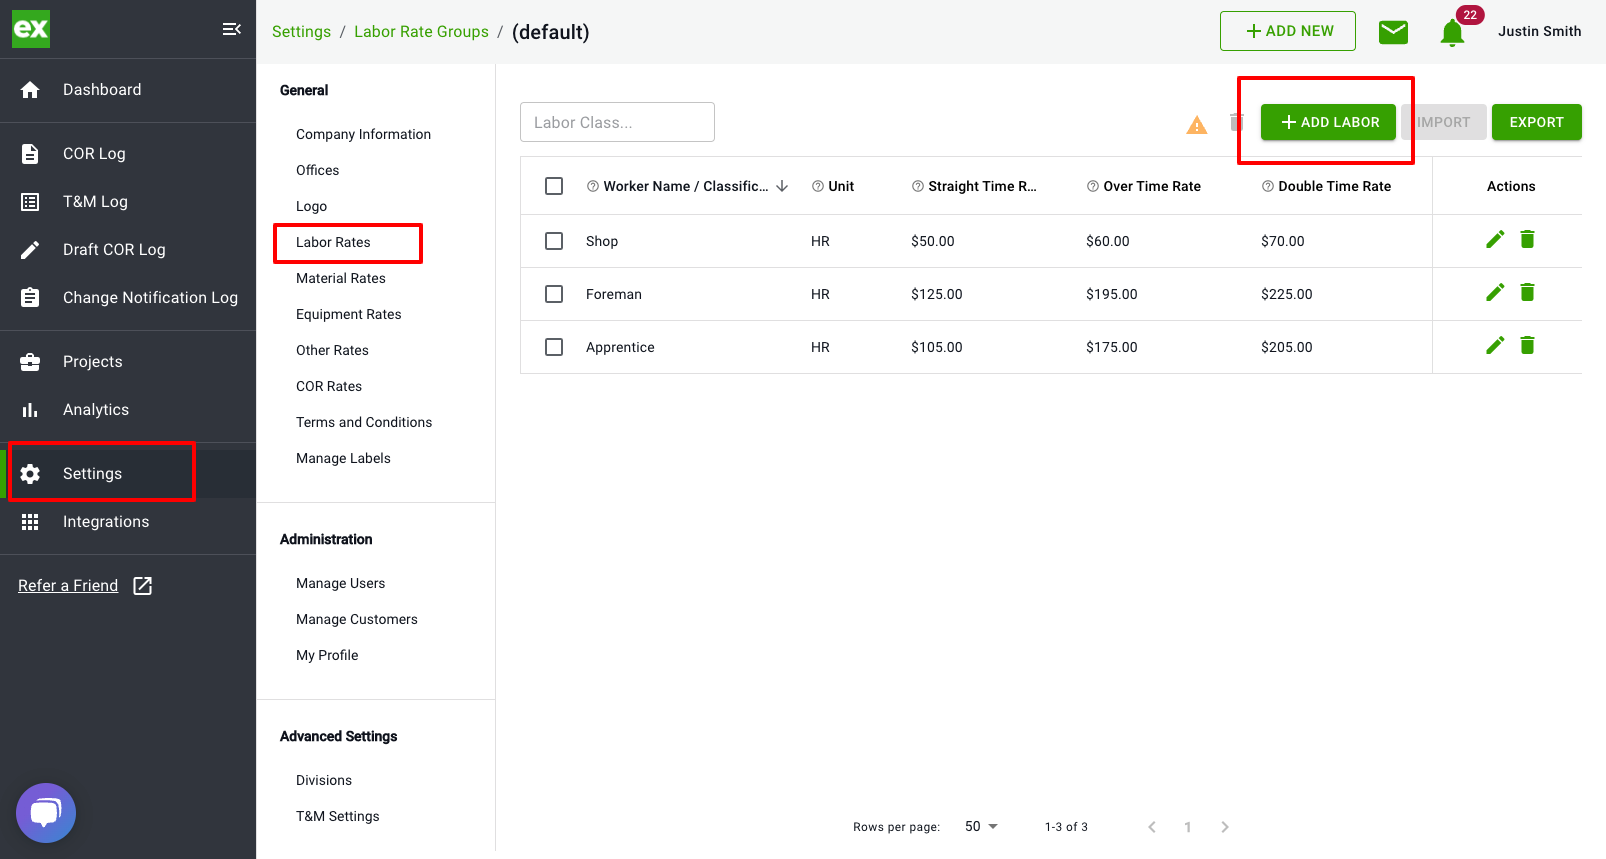
- Click on "+ADD LABOR" to add in a new line item. This will open a blank line to be filled out as shown in the example above.
- Type in the worker's name or classification in the field above.
- By default, all labor in Clearstory is tracked on an hourly basis. We standardize this by:
- Straight Time
- Overtime
- Double Time
- Premium Overtime
- Premium Double Time
- Once you are done inputting the name and rates, click on the "Save" icon and the line item will be added.
- To delete a line item click on the "Trash" icon.
Add Material Rates
To add Material rates, first, click on the group you would like to add rates.
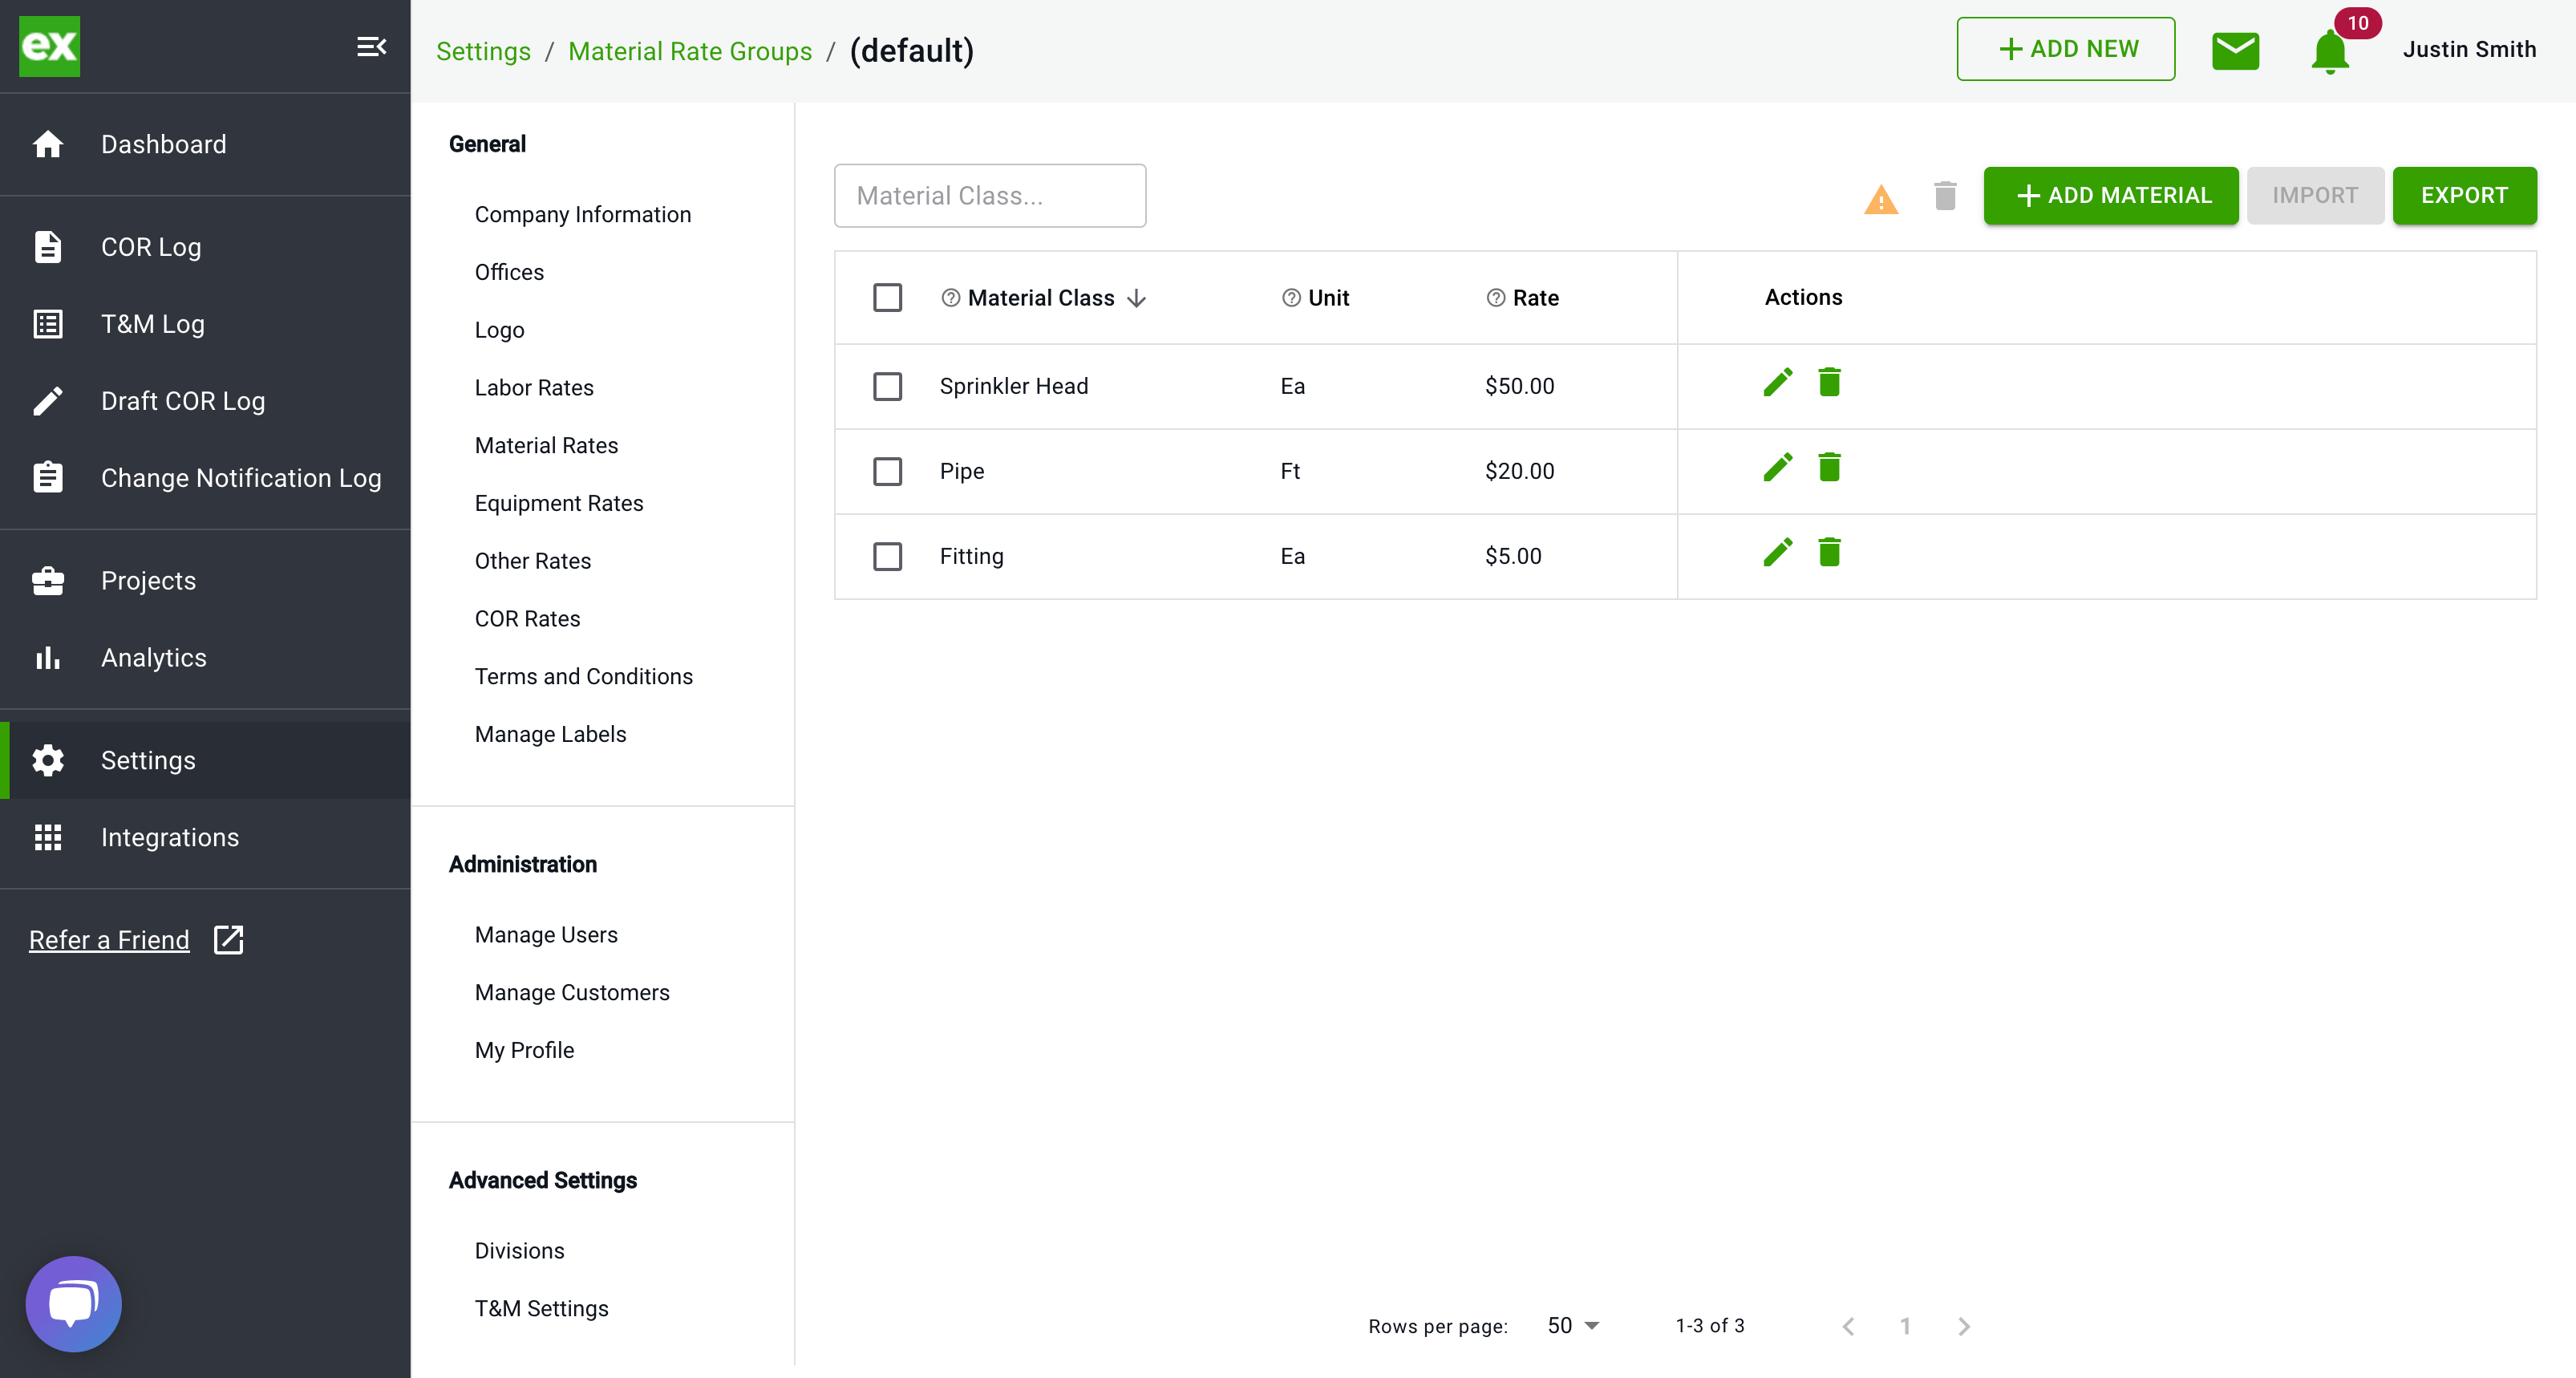
- Click on "+ADD MATERIAL" to add in a new line item. This will open a blank line to be filled out as shown in the example above.
- Type in the description of the material in the "Material Class" field above.
- Next, enter the unit you use to measure this material item. For example, if you were adding drywall you might use a sheet as the unit, if you were adding concrete you might use "Cubic Yard (or CY) and if you were adding conduit it might be lineal foot (or LF).
- Enter the rate that is calculated by the unit.
- Once you are done inputting the name and rates, click on the "Save" icon and the line item will be added.
- To delete a line item click on the "Trash" icon.
Add Equipment Rates
To add Equipment rates, first, click on the group you would like to add rates.

- Click on "+ADD EQUIPMENT" to add in a new line item. This will open a blank line to be filled out as shown in the example above.
- Type in the description of the equipment in the "Equipment Class" field above.
- Next, enter the unit you use to measure this Equipment item. Most commonly equipment is measure Hourly, Daily or weekly but this can be set up however your company chooses.
- Enter the rate that is calculated by the unit.
- Once you are done inputting the name and rates, click on the "Save" icon and the line item will be added.
- To delete a line item click on the "Trash" icon.
Add 'Other' Rates
To add Other rates, first, click on the group you would like to add rates.

- Click on "+ADD OTHER" to add in a new line item. This will open a blank line to be filled out as shown in the example above.
- Type in the description of the equipment in the "Other Class" field above.
- Next, enter the unit you use to measure this Other item. Other rates are good to use for things like Subcontractors or miscellaneous costs you want to track.
- Enter the rate that is calculated by the unit.
- Once you are done inputting the name and rates, click on the "Save" icon and the line item will be added.
- To delete a line item click on the "Trash" icon.
Manage Mark-Up Rates
Each COR has a markup rate break down section that can be managed at the company level or on a project-specific basis. This allows you to customize this section of the COR page below.

To learn how to customize this section, check out this article: How to customize your mark up section.
Manage Project Level Rates
When you create a new project your "Company Standard" rates will automatically pull into that new project. You can easily change to a different group of rates or edit the rates specific to that project.
- To get to this section navigate to Projects > [Project Name] > My Project Rates.
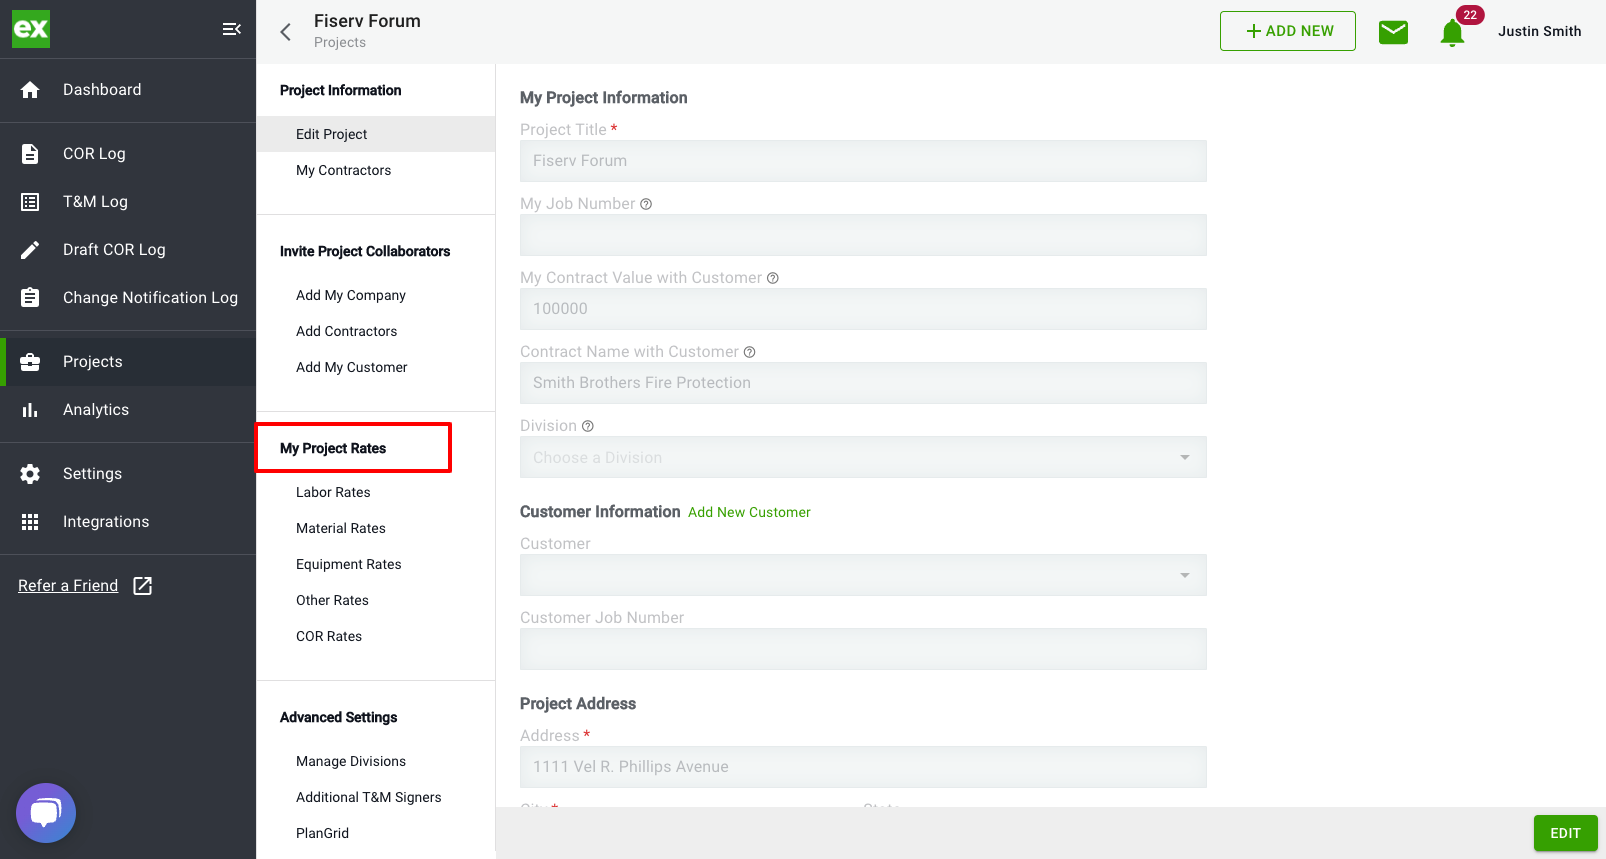
- When you click on "My Project Rates" you can see the labor, material, equipment, other and COR rates appear.
- Click on the section that you want to manage or change for this project.
- By default, the "Company Standard" rate group for each section will already have been applied.
- To modify the rates you can either:
- Edit the individual line items or add/delete line items.
- Select a different group of rates to be applied to the project.
- Whatever you change and save here will be applied to all new T&M Tags and CORs created just for this project.
- Note: Any updates made to the project level will not effect the saved groups at the company level.